
Outline: In this guide, we will be using Active Directory Domain Services (AD DS), a service that is part of the active directory used to administrate multiple users and computers through a single repository. We will go over the multiple use cases such as creating objects, delegating controls, creating security groups, and more. Along with writing a PowerShell script to create users, this guide also covers the fundamental commands used to create and manage objects. The purpose of this guide is to educate others about the value of Active Directory and how to utilize it in an IT environment.
Table of Contents
Basic Definitions
Installing Active Directory Domain Service(AD DS)
Understanding Structure
Creating OUs
Creating Users
Adding Computers
Delegating Controls
Creating Groups
Deleting OUs
Basic PowerShell Commands
Creating basic accounts:
See the properties of a user:
Adding Information
Unlocking Accounts
Locked Out Accounts
Simple User Creation PowerShell script
Important Definitions
Windows domain: A domain is a collection of devices and users that are managed by a particular business.
Active Directory (AD): Domain administrators tend to centralize the domain into a single repository to make administration much easier. This is called Active Directory. Active Directory is useful when an organization has potentially hundreds of users and computers to manage.
Domain controller: The server that runs Active Directory and authenticates user credentials when a user attempts to log in.
Object: Any element that represents a resource. This can be a user, computer, printer, or group.
Installing Active Directory Domain Services (AD DS)
Note: If you are using Virtual Box, change the network from NAT to a bridged adapter, or to a NAT network if you are only using VMs.

Step 1: Download Windows Server — https://www.microsoft.com/en-ca/windows-server. Be sure to download the GUI version during installation.
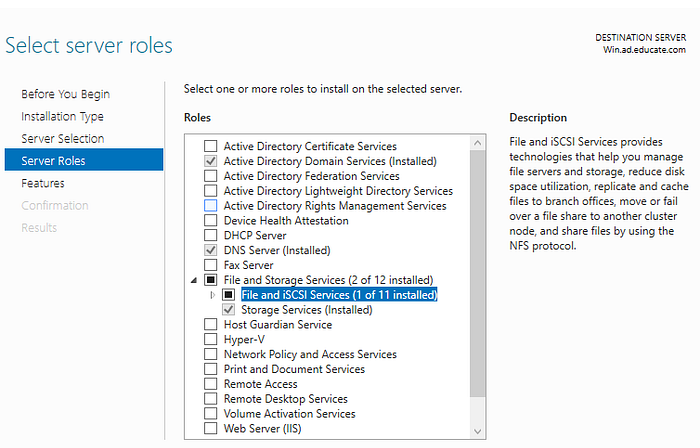
Step 2: Follow these steps — “Sever Manager” > select “Manage” > “Add Roles and Features” > “Next” > “Role-Based or Feature-based Installation” > “Next” > select the server (we only have one for now) > “Next” > checkbox “Active Directory Domain Services” > “Next” > leave everything else and finish up the installation.
Step 3: Click on the flag with the yellow triangle at the top and select “Promote this server to a domain controller”.

Step 4: Click “Add a New Forest” > name your root domain. I will name it “educate.com” > “Next” > type in the password for DRSM (this is used for repairing and recovery) > “Next” > Name your NetBIOS (typically is the subdomain of the DNS domain). I will name it “EDUCATE” > “Next” > leave everything else and finish up installation > restart your computer.

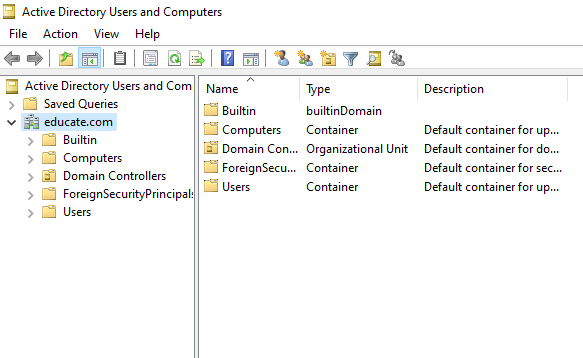
Step 5: From the Server Manager, go onto: “Tools” > “Active Directory Users and Computers”. You can also search it up from the Windows Taskbar.
Understanding Structure
On the left, you will structured folders that hold users, computers, and groups on the domain. These folders that hold objects are called Organizational Units (OUs). OUs are used to manage objects that have similar roles. For example, you might have an OU for the sales department and another OU for the IT department. Remember that objects (users, computers, groups) can only be part of a single OU at a time in a domain. You can also move objects by right-clicking the desired object and clicking on “move” or by doing Ctrl + x, Ctrl + v.
You can also make an OU inside of another OU. This is called a child OU and is used to structure it into a neat format.
Creating OUs
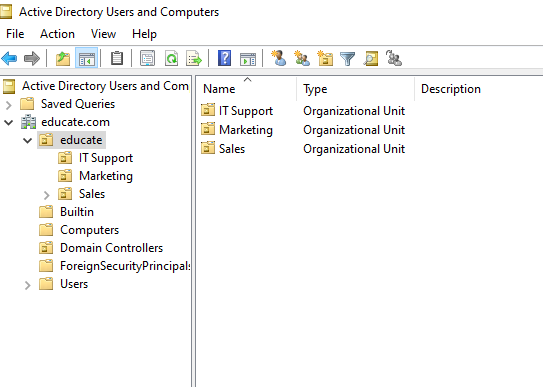
Step 1: Right click on “educate.com” (the domain) > “New” > “Organizational Unit”. We’ll call it “educate”.
Step 2: Right click on “educate” and create 3 child OUs. Name them “IT support”, “Sales”, and “Marketing”. These will be our departments to which we will assign users.
Creating Users
To manage users, we first need to make the user.
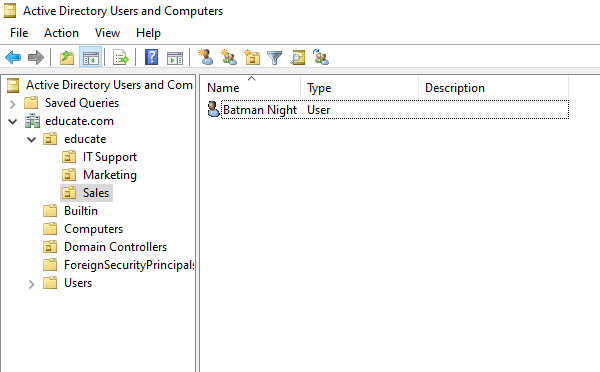
Step 1: Right click on the Sales department OU > “New” > “User”.
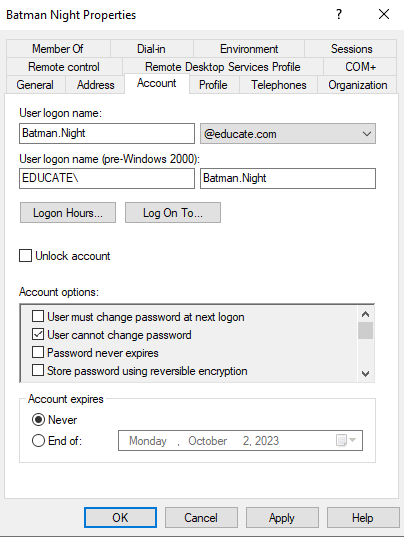
Step 2: I'm going to name my user “Batman Night”. The user logon name will be “Batman.Night” ( Firstname.Lastname naming convention).
Step 3: Create a password for your user and require them to change it at the next logon. Repeat steps 1,2, and 3 for the IT support and marketing department. IT support’s user will be called “Spider Man” and the marketing OU will be called “Wonder Woman”.
Congratulations, you’ve created users! Lets go over what you can do with it.
Here are some of the useful settings:
Account: Logon hour management, account expiration, force password change, change username, disable and enable accounts, reset accounts.
Remote control: Control or observe a user’s session.
Sessions: Manage sessions.
Adding Computers
When a computer connects to a domain, it should automatically be added to Active Directory.
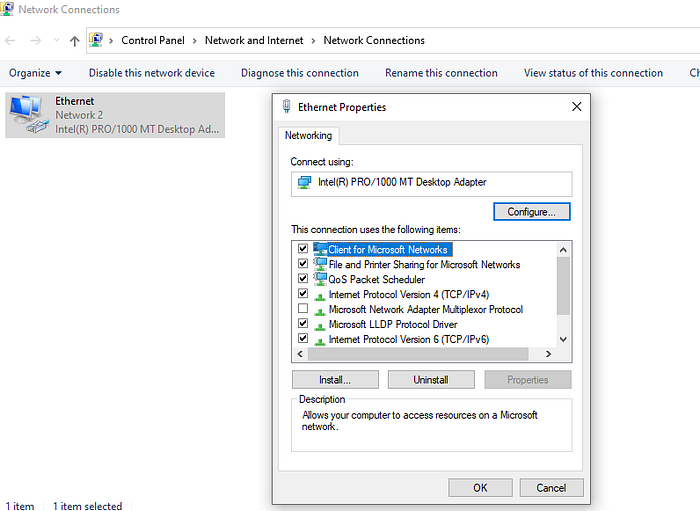
Step 1: Go on your a desired client computer > “Control Panel” > “Network and Internet” > “Network Connections”
Step 2: Right click on your connection > “Properties”
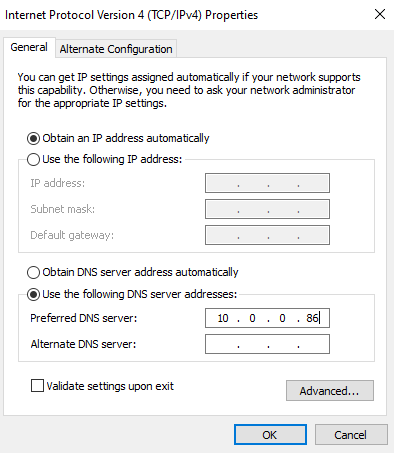
Step 3: Double click on “Internet Protocol Version 4 (TCP/IPV4)”> Click on “Use the following DNS server address:”.
Step 4: Type in your domain controller’s IP address (Note: To find the IP address, go onto command prompt in the domain controller and type in “Ipconfig” and locate the IPv4 address) > Click “OK”.
Now to connect to the domain:
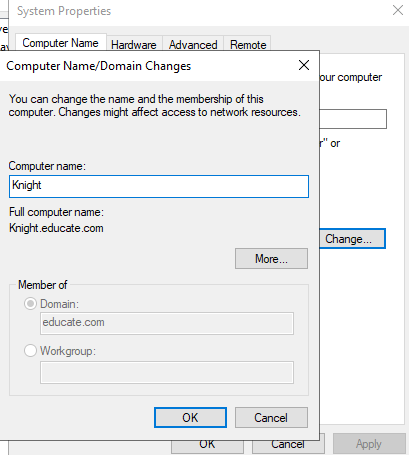
Step 5: Go to your “Settings” > select “System” > “About” > “Advanced System Settings” > “Computer Name” > “Change” > “Domain”. Type in educate.com (or whatever you named your domain). You may also change the computer name (I’ll name it “Knight”) > “OK” > type in the domain admin’s username and password > reset your computer. (Note if you are having trouble connecting, disable the “Internet Protocol Version 6 (TCP/IPv6).
Step 6: Go back to “Active Directory Users and Computers” and click on the “Computers” OU.
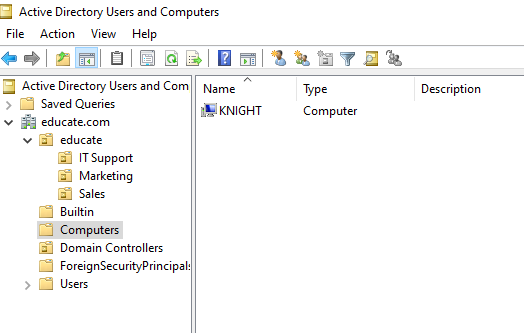
You should see that your computer has been connected.
Delegating Controls
The delegate control option enables users to manage specific OUs with specific permissions without requiring an administrator to be present. For example, a user from the IT support can have delegation controls over the sales department to reset their passwords.
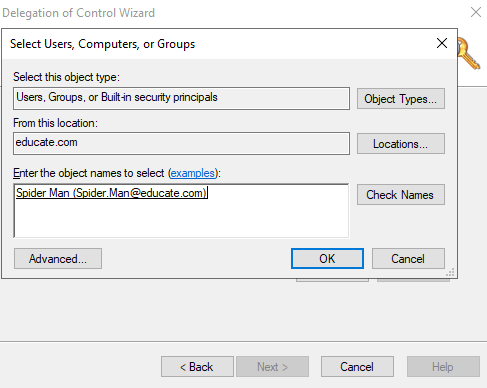
Step 1: To set it up, right click on the “Sales” OU and click on delegate control > click “Add” and type in “Spider Man” > click the “Check Names” and it should auto fill the account > Click “OK” > select “Reset user passwords and force password change at next logon”. Spider can now change passwords for the sales department users.
Lets change Batman Night’s password.
Step 2: Log into Spider Man’s account (username: Spider.Man) on the domain controller. We will be using PowerShell since Spider Man doesn't have access to AD DS. Type in the following command:
Set-ADAccountPassword Batman.Night -Reset -NewPassword (Read-Host -AsSecureString -Prompt 'New Password')Log into Batman to confirm.
Creating Groups
Groups are used to add users to a group that has permissions to specific resources. The difference between groups and GPO’s is that groups are used to grant users permissions over resources while GPO’s are used to apply policies to objects.
Step 1: Add another user to the marketing OU. I will name it “Hulk Smash”.
Step 2: Left click on the OU > “New” > “Group”.
We can see 3 options in the Group scope; Domain Local, Global, and Universal. “Domain local” means that the group will only contain users that are within the domain. “Global” lets us add users from any domain in the whole forest. “Universal” lets you select users from multiple forests that have built trusts between each other such as from inheriting another company.
We can see 2 options in the Group Type; Security and Distribution. Security allows objects to gain access to shared folders. Distribution is used when you have an email server.
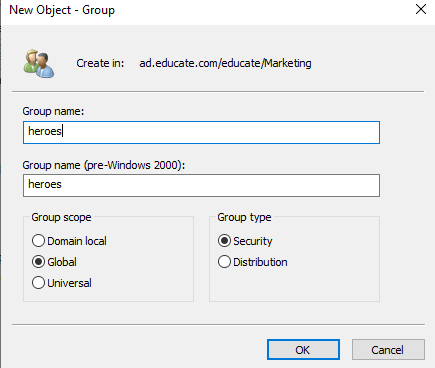
Step 3: Create a global security group in the marketing OU. I will name it “heroes”.
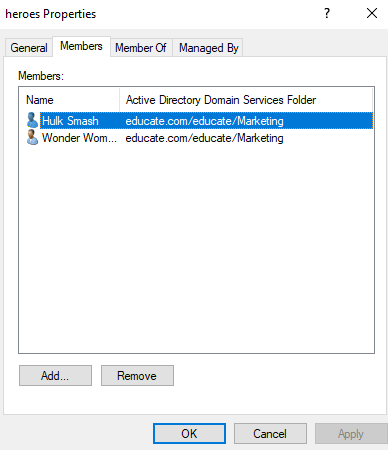
Step 4: Double click “heroes” > “Members” > “Add” > add Hulk Smash and check the name > Click “OK” (Note: You can also add a group to a group in the “member of” tab). Repeat the same for Wonder Woman.
Step 5: Go to your “file explorer” > “documents” > create a file named “Villains” > create a text file named “test.txt”.
Step 6: Properties of the file > “Security” > “Edit” > “Add” > add “heroes” > “Check name” > “OK” > checkbox “Full Control > click “Apply”.

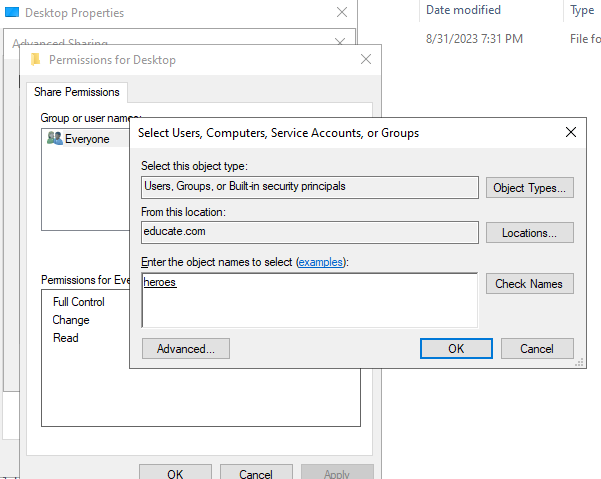
Step 7: “Properties” of the file > “Sharing”> “Advanced Sharing” > Make sure to remember your network path (mine is \\WIN\villains) > “Permissions” > “Add” > Type in “heroes” > “Check name” > “OK” > checkbox “Full Control” > click “Apply”.
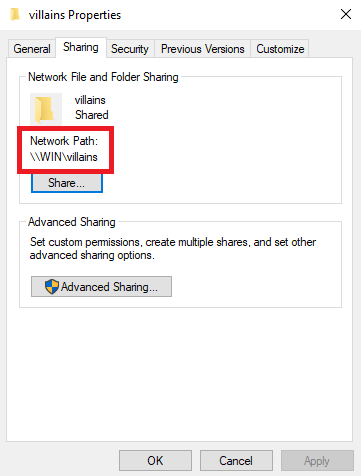
Go onto your client host > “files” > “network” > type in your network path into the location.

Deleting OUs:
Step 1: Create An OU called “deleteme” under “educate”.
Step 2: Click “View” at the top > “Advanced Features” > Right click on “deleteme” > “Properties” > “objects” > uncheck “Protect object from accidental deletion” > click “Apply”.

3: Delete the “deleteme” OU.
Basic PowerShell Commands
See the available commands related to active directory and their syntax:
Get-Command *aduserGet-Command *adcomputerGet-Command *-AD*Creating basic accounts
new-aduser -SamAccountName Mini.Mouse -GivenName Mini -Surname Mouse -UserPrincipalName Mini.Mouse@educate.com -accountpassword (Read-Host -AsSecureString “Type in password”) -Enabled $trueSee the properties of a user
Get-ADUser Mini.Mouse -Properties *Adding Information
Set-ADUser Mini.Mouse -Country CaGet-ADUser Mini.Mouse -Properties CountryLocked Out Accounts
None are locked out so it should return nothing.
Search-ADAccount -LockedOutUnlocking Accounts
Its already unlocked so nothing will happen.
Unlock-ADAccount Mini.MouseUse this link from Microsoft to learn the syntax. For example you can force change the password at next logon with the syntax:
-ChangePasswordAtLogon $true.Simple User Creation PowerShell script
Open PowerShell ISE:
Import-Module ActiveDirectory

$firstname =Read-Host -Prompt "please enter your first name"
$lastname =Read-Host -Prompt "please enter your last name"
$password =Read-Host -AsSecureString - "please enter your password"
$email =Read-Host  -Prompt "please enter your email"
$country =Read-Host -Prompt "please enter your Country's ISO code"

New-ADUser `
    -Name "$firstname $lastname" `
    -GivenName $firstname `
    -Surname $lastname `
    -UserPrincipalName "$firstname.$lastname@educate.com" `
    -SamAccountName "$firstname.$lastname" `
    -EmailAddress $email `
    -Country $country `
    -AccountPassword $password `
    -Path "OU=Sales,OU=educate,DC=educate,DC=com" `
    -ChangePasswordAtLogon $True `
    -Enabled $True
Refer to the above code: We start off with importing the Active Directory module and creating variables that reads the input. The password must include the -ASSecureString.
We then create a new Active Directory user along with using the multiple syntax’s to add information while calling the variables associated with each syntax. Keep in mind that if there is a space in a string, quotation marks are required, otherwise they are not.
In order to prevent getting one long line, we can use the grave accent key (`) at the end of a sentence to continue the command to the next line.
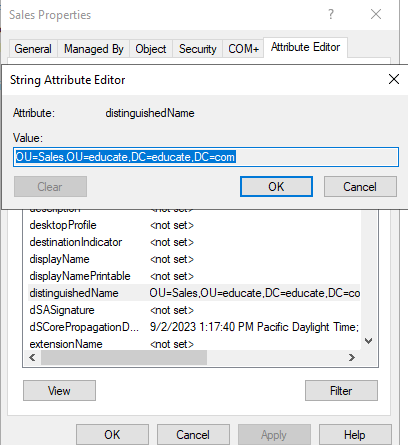
In order to get the path, go to: “Active directory Users and computer” > “View” > “Advanced Features” > “Properties” of desired OU > “Attributed Editor > “Distinguished Name”.
Feel free to add more information to the code such as the employee ID, telephone, or postal code.

Congratulations! You now learned the basics of Active Directory!